Whenever you to think to install linux you probably think it would be nice and something different as compare to windows but for an hour you will get through the desktop themes installing new themes decorating your desktop but when the time come to work on the linux you prefer to switch on the windows because it made the task easier as compare to linux based operating systems.
There are literally thousands of apps related to linux in which whenever you want to install you to seek the information from the authentication user password you will have to enter whenever you want to access any data related .
Before you get started, you need to be prepared to be your own support system. While you can usually get help with Linux problems on different message boards on the web, before you do that, you need to make the effort to solve your own problems. Linux Drivers don’t have much sympathy for people who don’t make an effort to help themselves.
Things are much easier now than they were in the early days of Debian, Slackware, and Red Hat. Modern distrait such as Ubuntu and SUSE LED install with crucial applications (web browser, photo editor, email client, word processor, etc.) and support for most hardware out of the box. With Ubuntu, you can boot off the CD to determine whether or not your rig will work with the OS before you make a single change to the hard drive. You can tell if you’re going to have a problem before you hose your system, which is always a good thing.
Before we get started installing Ubuntu, feisty fawn, you’ll need to download the appropriate ISO file from the Ubuntu downloads page and burn it to disc. For neophytes, we generally recommend starting with the x86 versions, even if your CPU supports AMD64 extensions. The proper file name for most people will be ubuntu-7.04-desktop-i386.iso.
To burn the disc, you can use commercial burning software (like Nero) or download and install the free ISO Recorder software. It’s also a good idea to run a backup before you get started (or anytime you muck around with your partitions, for that matter).
The First Boot
Once you’ve burned the ISO, you’ll need to boot your PC from the Ubuntu CD, which will involve either manually selecting the optical drive or changing the boot order in your BIOS. After several minutes, you should see the basic Ubuntu desktop. You should have access to most of your hardware, including network, sound, and graphics. Some typical gaming components simply don’t have good Linux support—notably the X-Fi series of soundcards and GeForce 8800–family videocards. We’ll talk about them in a bit.
Install!
Assuming you booted into the live desktop properly, starting the install process is as simple as double-clicking the Install icon on the desktop. The install program will prompt you for your language, location, and keyboard layout before you get to the hard-disk partitioning section.

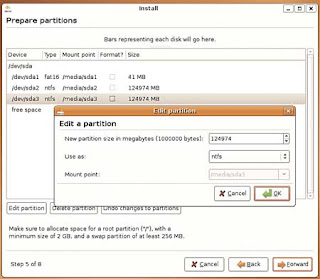
Choose the manual option when it comes time to partition your hard drive.
Partitioning your hard disk is the only step of the install process that has the potential to do serious harm. If you install to the wrong partition, you could accidentally nuke your Windows drive and all of its contents (that’s why we recommend running a full backup before you start the install process). The safest way to install is to add a new hard drive or just create free space on the disk—however, that’s not always an option. If you want to resize your existing partition, select the Manual option. Select the partition you want to resize and click Edit Partition. Then input the new size for the partition in megabytes (leave the other settings alone) and press OK. Next, you’ll need to create a swap partition. Highlight the newly created free space, click New Partition, set the size to 2,000MB, and choose Swap. Click your free space once again, then New Partition, and change the mount point to /. Leave the other settings alone and press Next.

If you choose to resize an existing NTFS partition, make sure you give your Linux install enough room. We used 120GB.
Now you’ll be prompted to import data from your Windows partition. The Ubuntu installer will pull your Gaim settings, Firefox bookmarks, music, photos, and documents over from your Windows install if you select these options. I had mixed results with this tool in the early build of Feisty—it crashed the installer on a few Vista machines we tested—but your mileage may vary. After you import files, you’ll be prompted to create a user account. You’re almost done!
The final step is to confirm your installer’s settings and press Install to finish the process. You’ll need to wait 20–40 minutes while the install completes and then finish by rebooting your PC and selecting the Ubuntu entry from the boot manager that was installed.
Using the Alternate Installer
If your machine won’t boot from the graphical install CD, either because you have a new videocard that’s not properly supported (GeForce 8800 series or newer) or you have an older unsupported chipset (notably the i915 integrated graphics), you’ll need to use the nongraphical installer, which is called the alternate installer, for your architecture. Download the correct alternate CD for your CPU (again from Ubuntu’s download page) and follow the prompts.
Connect to the Network
Getting your machine on the network is simple with Ubuntu, whether you use a wired connection or Wi-Fi. When you first boot, the only icon in your system tray at the top of the screen should be for networking. Simply click it, enter your SSID and WPA or WEP key (if necessary), and you’ll be on the network.
Finding and Installing Software
There are two ways to install programs on your new Ubuntu machine. The simplest is to use the Add/Remove panel, which lets you see all the software available to you from Ubuntu software repositories on the Internet. Most apps include a useful description, so if you search for Photo Manager, you’re sure to find some worthy candidates.
Sometimes you’ll need to fire up the more powerful Synaptic Package Manager, which you’ll find in System > Administration. After entering your password, click the Reload button to make sure the list of available apps is up to date. Synaptic provides a powerful search and easy filters that will help you find all the details of the applications installed on your system. You can see what apps are installed and which have updates available. If you want to update a single program to the latest available version, Synaptic is the easiest way to do that—just search for the software package, right-click it, and select “Mark for upgrade.”
You’ll occasionally need to add a new repository to your Linux install. A repository is just a server that contains software that’s configured and ready to run on your machine. If you want to install apps that aren’t included by default with Ubuntu, you’ll need to enable other respositories. To add a respository, you’ll need its apt line, which gives the software manager all the info it needs to access the repository (we’ll include some throughout this article). Open Synaptic and click Settings > Repositories. Go to the Third-Party tab and click Add; then type the apt line, exactly as it appears, in the window. Click Add Source, then click Close.
3D-Accelerated Videocard Drivers
There’s a lot of controversy surrounding the use of closed-source drivers for graphics hardware, but they’re the only option for 3D acceleration in Linux right now. The procedure for Nvidia and ATI hardware is a little different.
Install Nvidia GPU Drivers
Installing Nvidia’s closed-source 3D-accelerated drivers is easy with Feisty. Go to System > Administration > Synaptic Package Manager and search for the nvidia-glx package. Right-click the selection and select “Mark for installation.” You’ll be prompted with a list of dependencies, which you’ll need to approve for the application to work. Click Apply to download and install the app. Then open a new terminal (Applications > Accessories > Terminal) and run this command: sudo nvidia-xconfig –add-argb-glx-visuals; follow the prompts and reboot.
Installing Nvidia’s closed-source 3D-accelerated drivers is easy with Feisty. Go to System > Administration > Synaptic Package Manager and search for the nvidia-glx package. Right-click the selection and select “Mark for installation.” You’ll be prompted with a list of dependencies, which you’ll need to approve for the application to work. Click Apply to download and install the app. Then open a new terminal (Applications > Accessories > Terminal) and run this command: sudo nvidia-xconfig –add-argb-glx-visuals; follow the prompts and reboot.
Install ATI GPU Drivers
Installing ATI drivers is a little more complex. First, you’ll need to disable the Composite option in your xorg.conf. Open a terminal and type sudo gedit /etc/X11/xorg.conf. In the gedit window, scroll to the section labeled Extensions and change the Option “Composite” line from “Enabled” to “Disabled”. Then in your already opened terminal window, type the following six commands:
Installing ATI drivers is a little more complex. First, you’ll need to disable the Composite option in your xorg.conf. Open a terminal and type sudo gedit /etc/X11/xorg.conf. In the gedit window, scroll to the section labeled Extensions and change the Option “Composite” line from “Enabled” to “Disabled”. Then in your already opened terminal window, type the following six commands:
sudo apt-get update
sudo apt-get install linux-restricted-modules-$(uname –r)
sudo apt-get install xorg-driver-fglrx
sudo depmod –a
sudo aticonfig –initial
sudo aticonfig –overlay-type=Xv
sudo apt-get install linux-restricted-modules-$(uname –r)
sudo apt-get install xorg-driver-fglrx
sudo depmod –a
sudo aticonfig –initial
sudo aticonfig –overlay-type=Xv
You’ll need to reboot your system to enable the driver.
Grt wrk Saurabh....Keep it up....!!
ReplyDeletethank you
DeleteKeep it up Saurabh...!!
ReplyDelete